Energy Saving Tips
-
Filling Holes and Cracks with Insulating Foam Sealant
Air leakage through lots of small holes and cracks around the home is a major cause of heating and cooling loss. In fact, adding up all the holes in the average residence is similar to heating and cooling your house year-round with an open window. To reduce energy costs, air-seal and eliminate drafts, start with an easy fix by applying insulating foam sealant throughout your home. According to the U.S. Environmental Protection Agency, using foam sealant to fill these gaps can typically save up to 20 percent annually on heating and cooling costs.
Supplies/Tools:
- Gloves (optional)
- Eye protection
- Straight edge or butter knife
- Insulating foam sealant
Insulating foam sealants come in different applications (i.e. windows and doors, gaps and cracks, firelock, aquascape and landscape). Be sure to apply the appropriate foam sealant and read all instructions thoroughly before applying. For this application, we will apply a gaps and cracks sealant.
- Before you apply the foam, make sure the area is free of dust, dirt and oil.
- Apply sealant foam on the outer part of the hole.
- Only fill about a quarter of the hole to allow room for the foam to expand.
- Use a flat edge tool or butter knife to scrape off excess foam.
Note: Read instructions to determine drying time of the foam; it may take several hours to dry completely. The cost for a 12-ounce can should be less than $5 at your local hardware or home improvement store.
Foam sealants expand to form an outer skin containing closed air cells that provide an effective barrier against energy loss. And when dry, most of these sealants can be painted to match trim. Use around windows and doors, plumbing fixtures, electrical outlets, baseboards, sill plates, exhaust vents, siding edges, sky lights, attic fans, garage ceilings, etc. This simple “recipe” can help you conserve energy and reduce heating and cooling bills.
-
Hot Water Heater Efficiency Tips
Water use and electricity go hand in hand. Heating water can account for 14 percent to 25 percent of the total energy consumed in a typical home. What’s more, systems used to clean public water supplies and deliver it to homes require large amounts of electricity. If your home receives water from a well or spring, the pump also draws power. So when we use water, hot or cold, we’re also using energy.
Techniques for trimming water use in your home are surprisingly simple. For one, you can significantly reduce hot water consumption by simply repairing leaks in fixtures—faucets and showerheads—or pipes. A leak of one drip per second can cost $1 per month.
You can also reduce water heating costs in a matter of seconds by lowering the thermostat setting on your water heater. For each 10º F reduction in temperature, you can save between 3 percent and 5 percent in energy costs. Reducing the setting also slows mineral buildup and corrosion in your water heater and pipes.
Although some manufacturers set water heater thermostats at 140º F, most households usually only require them set at 120º F. However, if you have a dishwasher without a booster heater, you may require water temperature within a range of 130º F to 140º F for optimum cleaning.
Adding insulation to your water heater can save around 4 percent to 9 percent in costs. To determine if you need to insulate your water heater, touch it. A tank that’s warm to the touch needs additional insulation.
Insulating your water heater tank is fairly simple and inexpensive, and will pay for itself in about a year. You can find pre-cut jackets or blankets available from around $10 to $20 and install it yourself. Choose one with an insulating value of at least R-8. In addition, don’t set the thermostat above 130º F on an electric water heater with an insulating jacket or blanket—the wiring may overheat.
Installing insulation on gas- and oil-fired water heaters is more difficult. For these appliances, it’s best to have a qualified plumbing and heating contractor perform the work.
Another way you can insulate your water heater and save money is through pipe wrap. This is a simple, cost efficient way to keep your energy use low.
-
Air Infiltration Inside Your HVAC Closet
Much of our home’s heating, cooling and overall comfort is lost through infiltration; air leaking into our conditioned space (the area we live in). These frequently unseen holes add to your HVAC system load while increasing your power bill. Many areas are easy to find, such as around windows, doors, plumbing, electrical penetrations, light switches and wall outlets and are simple to seal with some caulk or foam sealant. Unfortunately, this is not the case with all air leaks.
According to a report by the Oak Ridge National Laboratory and Pacific Northwest National Laboratory, a homeowner can save 10 – 20 percent on heating and cooling costs just by sealing up all those air leaks.
Some homes have HVAC systems located inside an indoor cabinet or closet (see picture). While this may be a convenient place, it’s also an ideal place for air infiltration. A large hole is created when contractors run the ductwork during installation, leaving a gap that can be 3-5 inches wide and the length of the four sides of your ductwork.
Once the hole is exposed, attic air can go directly into the unit causing it to run inefficiently. Also, your return air grille (a connection to ductwork that allows air to return to a heating and cooling system) is often located directly under your unit cabinet and will pull unconditioned instead of conditioned air into your home. Additionally, your thermostat is typically located near your cabinet and the temperature around it will be closer to the attic temperature instead of the rest of your home, resulting in your unit running longer.
An easy fix to this problem is to cover this gap with commonly used materials such as plywood or foam board. Sealing the hole with one of these options and adding insulation is the best way to help close off air infiltration.
To identify problem areas in your home, take advantage of our energy audit program. The Advanced Audit is $100 and the Basic Audit, which includes everything except the blower door test (which is a great way to identify air leaks in your home), is $75. Either audit cost is refundable after the member makes the suggested improvements identified by our Energy Services Representative and presents receipts. Members have up to one year to complete the recommendations in order to be eligible for the refund.
-
How Renters can Fight the Winter Chill
According to the U.S. Census Bureau, 33 percent of Americans lease their homes. Unfortunately, many lease agreements forbid major alterations to rental properties. But don’t worry, renters! Consider using these low-cost, energy-efficient tips from CAEC to improve the efficiency of your home this winter.
Hot savings
Heating the home typically makes up about 48 percent of your utility bill. Set your thermostat as low as is comfortable in the winter – Energy.gov recommends 68 degrees Fahrenheit to boost energy efficiency.
During the winter months, take advantage of heat from sunlight. Open draperies and shades during the day to allow natural light to heat your home. Remember to close them in the evenings as the temperature drops and windowpanes become chilly.
Does your home have window air conditioning units? This winter, remember to insulate the units from the outside with a tight-fitting cover, available at your local home improvement center or hardware store. This keeps heated air from escaping outside. If desired, you can remove the window unit during winter months to prevent energy loss.
Another way to save on heating is to make sure your water heater is set at the lowest comfortable setting. Have you experienced scalding hot water when taking a shower? If so, it’s likely that your water heater is set too high – which is a waste of energy. Older models of water tanks are often not insulated, which can be easily remedied by covering them with an insulating jacket.
Bright ideas
Lighting is one of the easiest places to start saving energy, and savings are not strictly limited to winter months. Try replacing a few of your most frequently used light bulbs with ENERGY STAR-qualified lights, and save more than $65 a year in energy costs. ENERGY STAR-qualified LED bulbs use 75 percent less energy and last several times longer than incandescent light bulbs, saving money on energy bills and replacement costs. Practicing energy-efficient habits is another great way to reduce energy use. Always turn off your lights when leaving a room.
-
Holiday Lighting Tips
This year is rapidly drawing to a close and that means the holiday lighting season is back. If your home is in need of a decorative refresh, here are some tips to take your artistic stylings to the next level.
As always, safety comes first. Most of these tips apply equally to inside and outside decorating activities and for installation at most any height:
- Have a ground crew (one or two people) to steady your ladder and pass up the decorations. They are an invaluable part of safety and keep you supplied with untangled light strings and fasteners.
- Remember to keep a safe distance from your overhead electric service.
- Don’t overreach. If you cannot get to a point with your body completely centered between the sides of the ladder, get down and relocate it.
- Don’t overextend the ladder. If your ladder is too short, rent or borrow a longer one. A ladder extended beyond its working limits is dangerous, as is standing on rungs too close to the top.
- Do not overload circuits by stringing more light sets together than the manufacturer recommends. Check the packaging for details.
- Check your wires for breaks and cracks in the insulation that can lead to shorts.
Light selection is important. If at all possible, invest in LED lights this season. Unlike the first LED versions that were characterized by rather harsh and unattractive colors, the newest generation’s colors are more reminiscent of the former incandescent lights.
Why go the LED route? Longevity and operating cost are the two key reasons. Unlike incandescent lights, whether the large or mini bulb, LEDs will last for many, many years. LEDs have no filaments to burn out. Aside from physically destroying the bulb, the LED is amazingly robust. Given the modest number of hours of operation, you can expect LEDs to last seven or more years.
There is also a benefit in the cost of operating LEDs. A reasonable estimate of power consumption is 7 watts per 100 lights. How does that compare to the old incandescent? Each of those bulbs used 12 watts so a string of 100 devoured 1200 watts.
If you truly want to manage the cost of operating holiday lights, invest in timers to turn the lights on and off automatically. You can also purchase a smart plug for your lights, which allows you to program and control them from your smart phone.
Holiday lights are a true treasure of the season, and by installing them safely and efficiently, you can ensure your display brings joy to people of all ages.
-
Attic Insulation
A common reason for energy loss in the home is insufficient insulation. Insulation in the attic or ceiling is one of the most important aspects in providing a boundary between your home and outside air. It also helps to minimize the heat lost during winter and reduce the amount of heat gain in winter.
To see if you have enough insulation, measure the amount currently present. If the amount is less than 6 inches thick, you might consider adding insulation to your home.
Next, determine the type of insulation – the three main types are fiberglass, cellulose, and foam. Fiberglass is the most common, cheapest, and least efficient. It looks like cotton candy with the main colors being white, pink, and yellow. Cellulose is a little more expensive, and the most common used for do-it-yourself installation. It is made of recycled paper mixed with harmless chemicals making it bug-proof and fire retardant; it also reduces outside noise. The final insulation type is foam, the most expensive and efficient insulation available. Foam must be installed by a professional and the average payback is five years.
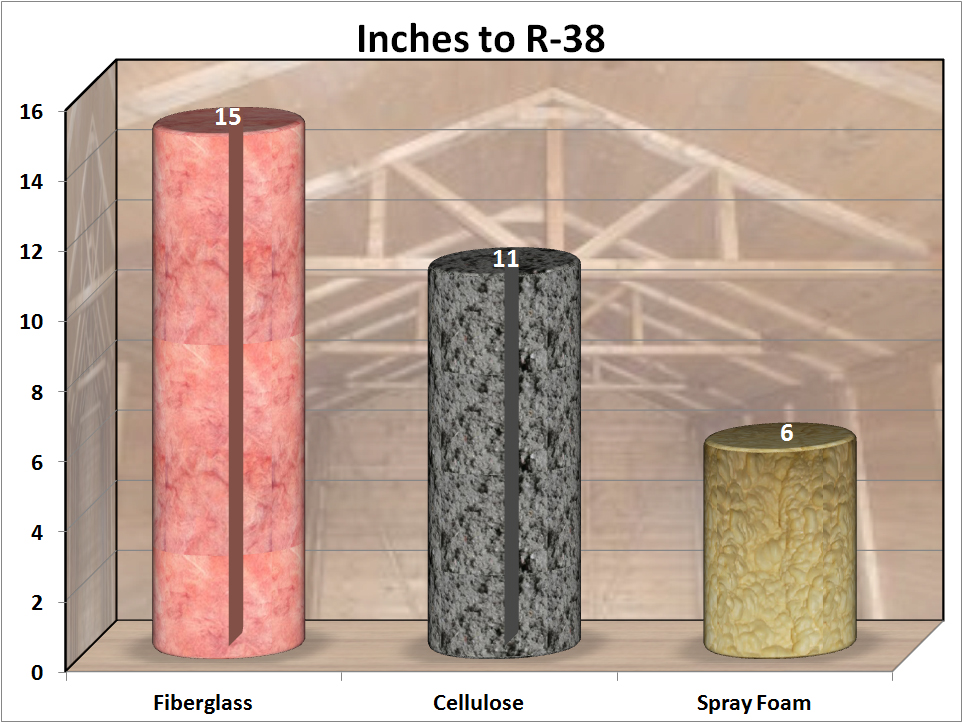
The efficiency of insulation is stated in R-values. R-value is the resistance to heat a product has – the higher the R-value, the more heat resistant. Most product labels state the R-value per inch, which is the baseline for each product’s efficiency. According to the Department of Energy, the R-values for the three most common types of insulation are: fiberglass-2.5, cellulose-3.5, and foam-6. CAEC recommends having your attic insulation at R-38. Below is a graph showing how many inches of each type of insulation is needed to reach R-38.
-
Insulating Water Lines
Insulating your home’s water pipes reduces heat loss and can raise water temperature 2-4 degrees Fahrenheit hotter than uninsulated pipes, allowing for a lower water temperature setting. You also won’t have to wait as long for hot water, which helps conserve water.
For exposed lines, such as in the crawlspace, or under a manufactured home, use pipe insulation foam to insulate the lines. Be sure to use the correct diameter based on the diameter of the pipes (i.e. if the diameter of the pipe is three-quarters inch, use the same size insulation). This will insure a tight seal around the lines. When installing foam insulation, do not leave any gaps where cold air could freeze the pipes.
For a home built on a slab foundation, you do not have to insulate the lines since they are covered by the concrete slab itself. But you do need to keep outdoor faucets protected for cold weather. An easy way to prevent the exposed faucets from freezing is fitting them with faucet covers, available at your local hardware store.
-
Insulating Your Attic Door
Ever wonder how much your attic entrance costs you each month in regard to your cooling and heating bills? The attic door can be one of the main areas of air infiltration and heat gain/loss in your home due to a lack of insulation and air sealing, essentially making it similar to having an open door to the outside.
You can insulate the attic door in multiple ways. The example below will show you how to build an encapsulated box. The materials are inexpensive (under $50), widely available, easy to work with and the project takes about 30 minutes.
Supplies/Tools:
- Foam board
- Caulk/foam
- Foil tape
- Utility knife
- Measuring Tape
- Measure the length, width and height of your attic access from inside your attic. You will need to measure high enough that the attic ladder can fit inside the box. Be sure to mark the foam board with your recorded measurements.
- Cut foam board at measured lengths. Apply safety precautions when utilizing the utility knife, such as cutting away from your body instead of drawing the knife towards you. Verify the pieces will fit over the attic door when closed before attaching the pieces.
- Tape pieces together with foil tape.
- Seal any gaps with caulk or foam. (Tip: If the hole is bigger than your thumb, use foam).
- Place box over attic door and verify the door will close without moving the box.
This is a relatively low-cost, simple and quick home efficiency project that can make a big difference in the comfort of your home.
-
Do It Yourself Installing a Programmable Thermostat
Imagine the air conditioning automatically cooling your home 10 minutes before you walk through the door. And wouldn’t it be nice not having to remember to bump the temperature back up as you leave for work? These small advantages make the programmable thermostat not only a budget-friendly upgrade, but a welcomed convenience.
Also on the market are smart programmable thermostats which are connected to Wi-Fi, allowing you to program your thermostat from your computer, tablet and smartphone.
According to the Department of Energy, installing a programmable thermostat can help you save between 5 and 15 percent on your monthly cooling and heating bills. The process to install a traditional programmable thermostat takes less than an hour, and with many models available starting at $25, you can recoup the initial expenditure after only one year of use.
Supplies/Tools:
- Programmable Thermostat
- Batteries (if applicable)
- Screwdriver
- Drill/driver
- Turn off the power supply to the thermostat at the breaker box and cut power to the indoor HVAC unit. This could be a switch or a breaker; it will be near the indoor air handler.
- Remove the old thermostat cover.
- Remove wires one at a time from the old thermostat and label each one with labels from the new thermostat. Once all the wires are labelled, remove the old thermostat plate from the wall. If the old thermostat contains mercury tubes, it must be recycled—check with your local hardware store for proper disposal.
- Install the new wall plate. Use a level and mark the location for the mounting holes. Drill the holes and, if needed, insert drywall anchors which should be provided with the new thermostat (this step will vary depending on the model). Feed the wires through the wall plate, pulling the wires out about an inch so they don’t fall back into the wall, then fasten the plate to the wall with a screwdriver.
- Follow the instructions in your manual to verify all the wires are connected correctly. The instructions should include two sets of wiring guides: one for a heat pump and one for a conventional (electric furnace) system.
- Install batteries (if appropriate) in the new thermostat and insert new faceplate.
- Restore power at the main breaker and next to the indoor air handler. Program the new thermostat according to the manufacturer’s instructions. Test the new thermostat to make sure it’s operating properly. If you have a heat pump, ensure the heat strips (auxiliary heat) are not coming on too soon or automatically—an indication of improper installation or an incompatible thermostat.
Installing a programmable thermostat is a small job that can have a big impact on your monthly cooling and heating bills. For proper installation and safety, be sure to follow the instructions precisely.
-
Do It Yourself Pipe Wrap
According to the Energy Information Administration, water heating accounts for approximately 18 percent of your home’s energy usage. To help save energy dollars, having an efficient water heater is only one part of the equation. You may be losing heat in the distribution piping from your water heater (even an energy efficient one) to your home’s faucets. Wrapping the exposed pipes from your water heater will aid in keeping the heat in the pipes and will help save you money. Below are instructions on how to properly install pipe wrap.
Supplies/Tools:
- Pipe Wrap
- Duct Tape
- Knife
- Tape Measure
- Remove any old pipe insulation.
- Measure the circumference of your existing pipe to determine what size pipe insulation you need. The measurement may be listed on the pipe itself (3/4 of an inch in the example).
- Measure the length of pipe insulation that you need and cut to the proper length.
- Open the slit in the insulation and slide over the pipe. Continue steps 3 and 4 until the entire exposed pipe is covered.
- To secure insulation in place, tape the length of the slit.
-
25 Simple Energy Efficiency Tips
Making your home energy efficient may seem daunting, but here are 25 simple tips to help you get started saving money and conserving energy in your home.
- Limit shower length to 5-7 minutes.
- Install low-flow shower heads.
- Repair dripping faucets.
- Select the cold-water cycle when washing clothes.
- Clean your dryer’s lint trap before each use.
- Line dry clothes instead of using a clothes dryer.
- Set the refrigerator temperature to 34 degrees to 37 degrees Fahrenheit and freeze temperature to 0 degrees to -5 degrees Fahrenheit.
- Use a microwave for cooking when possible.
- Put lids on pots to help food cook faster when cooking on a range.
- Use hot water instead of cold water when used for cooking.
- Simmer foods in a slow cooker instead of on the stove.
- Choose the air-dry cycle instead of heat-dry cycle on your dishwasher.
- Replace any light bulb that burns more than one hour a day with its compact fluorescent bulb equivalent.
- Turn off computers and monitors when not in use.
- Unplug battery chargers when not in use.
- Purchase new or replace old appliances with ones that are ENERGY STAR® approved.
- Set thermostats to 78 degrees Fahrenheit in the summer, 68 degrees Fahrenheit in the winter.
- Change HVAC (Heating, Ventilation, and Air Conditioning) filters monthly.
- When installing new air filters, make sure they are facing the correct direction (look for the arrow on the side of the filter.
- Close fireplace dampers when not burning a fire.
- Do not close supply air registers and vents.
- Weather strip windows and doors properly.
- Insulate your attic door access.
- Minimize use of electric space heaters.
- Always operate your HVAC system fan on “auto” to use less electricity and increase your air conditioner’s ability to remove moisture.
-
Light up Your Holidays for Less with LEDs
When store aisles are full of holiday décor and you might notice that not only do some of these items make your home look festive, but they do so while saving money on your energy bill. LED (Light-emitting diodes) Christmas lights not only offer a quality alternative to traditional incandescents, but many other advantages as well.First, using LED Christmas lights on a 6-foot tree, 12 hours a day for over 40 days can save at least 90 percent on holiday light energy costs when compared to using traditional incandescent lights. LED’s also have a much longer operational life span, lasting roughly 20,000 hours and are cooler to the touch than incandescents—helping to reduce the risk of fire and personal injury.
While many LED lights are made in the same shapes and varieties as traditional lights, they are more durable than incandescent lamps and are typically made of solid plastic rather than glass.
When purchasing LED’s, look for manufacturers and brands with the ENERGY STAR logo designating them as having been tested for energy efficiency and quality standards. And as always, make sure you purchase the correct light for the job—outdoor lights should only be used outdoors and indoor lights for indoors.
Show your holiday spirit this season, and save on your energy bills at the same time with LED holiday lights.

