
Insulation and Sealing
-
Managing energy use effectively
At CAEC, we’re dedicated to helping our members save energy and reduce costs while maintaining comfort and convenience. Here are some practical, actionable tips to help you manage energy use effectively and keep your bills under control:
- Focus on energy efficiency
- Seal air leaks: Inspect windows, doors and other spaces for drafts. Use weatherstripping, caulk or foam to seal leaks and prevent energy loss. Take advantage of our audit program to determine exact locations of air leaks.
- Upgrade insulation: Proper insulation in your attic, walls and floors can significantly reduce heating and cooling costs.
- Install energy-efficient windows: Double-pane or energy-efficient windows help maintain indoor temperatures year-round.
- Optimize heating and cooling systems
- Use a programmable thermostat: Set your thermostat to adjust automatically when you’re asleep or away. For each degree you lower heating or raise cooling, you save on energy costs.
- Schedule regular maintenance: Clean filters and schedule annual checkups for HVAC systems to keep them running efficiently.
- Use ceiling fans wisely: In winter, reverse the fan direction to redirect warm air toward the floor; in summer, set fans to rotate counterclockwise for cooling.
- Upgrade to energy-efficient appliances
- Look for ENERGY STAR® labels: Appliances like refrigerators, dishwashers and water heaters with ENERGY STAR certifications use less energy.
- Unplug unused devices: Even in standby mode, electronics draw power. Use power strips to turn off multiple devices at once.
- Consider heat pump water heaters: These use up to 60 percent less energy than standard electric water heaters.
- Adjust daily habits
- Switch to LED lighting: LEDs use up to 75 percent less energy than incandescent bulbs and last much longer.
- Dry clothes naturally: Take advantage of sunny days by air-drying clothes on a line.
- Leverage cooperative programs
- Energy audits: We offer two styles of audits, the traditional in-person audit conducted by one of our Energy and Technology Consultants (ETC), as well as a virtual audit. Once the energy audit is performed, members will have the opportunity to correct issues in the home based on the ETC’s recommendation. The return on investment comes in the form of savings on your power bill due to reduced energy usage.
- Efficiency incentives: Take advantage of the numerous rebates, loans and discounts for energy-efficient appliances or upgrades.
CAEC is here to support you! Contact us for personalized energy-saving recommendations, programs and incentives to make your home more efficient and your energy bills more manageable.
-
Filling Holes and Cracks with Insulating Foam Sealant
Air leakage through lots of small holes and cracks around the home is a major cause of heating and cooling loss. In fact, adding up all the holes in the average residence is similar to heating and cooling your house year-round with an open window. To reduce energy costs, air-seal and eliminate drafts, start with an easy fix by applying insulating foam sealant throughout your home. According to the U.S. Environmental Protection Agency, using foam sealant to fill these gaps can typically save up to 20 percent annually on heating and cooling costs.
Supplies/Tools:
- Gloves (optional)
- Eye protection
- Straight edge or butter knife
- Insulating foam sealant
Insulating foam sealants come in different applications (i.e. windows and doors, gaps and cracks, firelock, aquascape and landscape). Be sure to apply the appropriate foam sealant and read all instructions thoroughly before applying. For this application, we will apply a gaps and cracks sealant.
- Before you apply the foam, make sure the area is free of dust, dirt and oil.
- Apply sealant foam on the outer part of the hole.
- Only fill about a quarter of the hole to allow room for the foam to expand.
- Use a flat edge tool or butter knife to scrape off excess foam.
Note: Read instructions to determine drying time of the foam; it may take several hours to dry completely. The cost for a 12-ounce can should be less than $5 at your local hardware or home improvement store.
Foam sealants expand to form an outer skin containing closed air cells that provide an effective barrier against energy loss. And when dry, most of these sealants can be painted to match trim. Use around windows and doors, plumbing fixtures, electrical outlets, baseboards, sill plates, exhaust vents, siding edges, sky lights, attic fans, garage ceilings, etc. This simple “recipe” can help you conserve energy and reduce heating and cooling bills.
-
Air Infiltration Inside Your HVAC Closet
Much of our home’s heating, cooling and overall comfort is lost through infiltration; air leaking into our conditioned space (the area we live in). These frequently unseen holes add to your HVAC system load while increasing your power bill. Many areas are easy to find, such as around windows, doors, plumbing, electrical penetrations, light switches and wall outlets and are simple to seal with some caulk or foam sealant. Unfortunately, this is not the case with all air leaks.
According to a report by the Oak Ridge National Laboratory and Pacific Northwest National Laboratory, a homeowner can save 10 – 20 percent on heating and cooling costs just by sealing up all those air leaks.
Some homes have HVAC systems located inside an indoor cabinet or closet (see picture). While this may be a convenient place, it’s also an ideal place for air infiltration. A large hole is created when contractors run the ductwork during installation, leaving a gap that can be 3-5 inches wide and the length of the four sides of your ductwork.
Once the hole is exposed, attic air can go directly into the unit causing it to run inefficiently. Also, your return air grille (a connection to ductwork that allows air to return to a heating and cooling system) is often located directly under your unit cabinet and will pull unconditioned instead of conditioned air into your home. Additionally, your thermostat is typically located near your cabinet and the temperature around it will be closer to the attic temperature instead of the rest of your home, resulting in your unit running longer.
An easy fix to this problem is to cover this gap with commonly used materials such as plywood or foam board. Sealing the hole with one of these options and adding insulation is the best way to help close off air infiltration.
To identify problem areas in your home, take advantage of our energy audit program. The Advanced Audit is $100 and the Basic Audit, which includes everything except the blower door test (which is a great way to identify air leaks in your home), is $75. Either audit cost is refundable after the member makes the suggested improvements identified by our Energy Services Representative and presents receipts. Members have up to one year to complete the recommendations in order to be eligible for the refund.
-
Attic Insulation
A common reason for energy loss in the home is insufficient insulation. Insulation in the attic or ceiling is one of the most important aspects in providing a boundary between your home and outside air. It also helps to minimize the heat lost during winter and reduce the amount of heat gain in winter.
To see if you have enough insulation, measure the amount currently present. If the amount is less than 6 inches thick, you might consider adding insulation to your home.
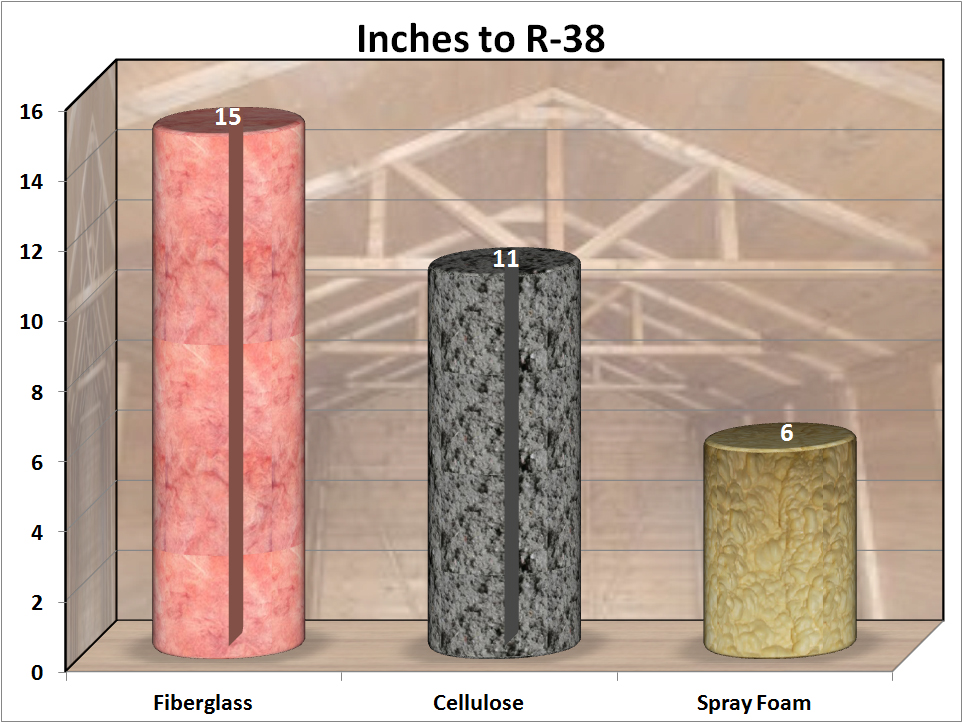
Next, determine the type of insulation – the three main types are fiberglass, cellulose, and foam. Fiberglass is the most common, cheapest, and least efficient. It looks like cotton candy with the main colors being white, pink, and yellow. Cellulose is a little more expensive, and the most common used for do-it-yourself installation. It is made of recycled paper mixed with harmless chemicals making it bug-proof and fire retardant; it also reduces outside noise. The final insulation type is foam, the most expensive and efficient insulation available. Foam must be installed by a professional and the average payback is five years.
The efficiency of insulation is stated in R-values. R-value is the resistance to heat a product has – the higher the R-value, the more heat resistant. Most product labels state the R-value per inch, which is the baseline for each product’s efficiency. According to the Department of Energy, the R-values for the three most common types of insulation are: fiberglass-2.5, cellulose-3.5, and foam-6. CAEC recommends having your attic insulation at R-38. Below is a graph showing how many inches of each type of insulation is needed to reach R-38.
-
Insulating Water Lines
Insulating your home’s water pipes reduces heat loss and can raise water temperature 2-4 degrees Fahrenheit hotter than uninsulated pipes, allowing for a lower water temperature setting. You also won’t have to wait as long for hot water, which helps conserve water.
For exposed lines, such as in the crawlspace, or under a manufactured home, use pipe insulation foam to insulate the lines. Be sure to use the correct diameter based on the diameter of the pipes (i.e. if the diameter of the pipe is three-quarters inch, use the same size insulation). This will insure a tight seal around the lines. When installing foam insulation, do not leave any gaps where cold air could freeze the pipes.
For a home built on a slab foundation, you do not have to insulate the lines since they are covered by the concrete slab itself. But you do need to keep outdoor faucets protected for cold weather. An easy way to prevent the exposed faucets from freezing is fitting them with faucet covers, available at your local hardware store.
-
Insulating Your Attic Door
Ever wonder how much your attic entrance costs you each month in regard to your cooling and heating bills? The attic door can be one of the main areas of air infiltration and heat gain/loss in your home due to a lack of insulation and air sealing, essentially making it similar to having an open door to the outside.
You can insulate the attic door in multiple ways. The example below will show you how to build an encapsulated box. The materials are inexpensive (under $50), widely available, easy to work with and the project takes about 30 minutes.
Supplies/Tools:
- Foam board
- Caulk/foam
- Foil tape
- Utility knife
- Measuring Tape
- Measure the length, width and height of your attic access from inside your attic. You will need to measure high enough that the attic ladder can fit inside the box. Be sure to mark the foam board with your recorded measurements.
- Cut foam board at measured lengths. Apply safety precautions when utilizing the utility knife, such as cutting away from your body instead of drawing the knife towards you. Verify the pieces will fit over the attic door when closed before attaching the pieces.
- Tape pieces together with foil tape.
- Seal any gaps with caulk or foam. (Tip: If the hole is bigger than your thumb, use foam).
- Place box over attic door and verify the door will close without moving the box.
This is a relatively low-cost, simple and quick home efficiency project that can make a big difference in the comfort of your home.
-
Do It Yourself Pipe Wrap
According to the Energy Information Administration, water heating accounts for approximately 18 percent of your home’s energy usage. To help save energy dollars, having an efficient water heater is only one part of the equation. You may be losing heat in the distribution piping from your water heater (even an energy efficient one) to your home’s faucets. Wrapping the exposed pipes from your water heater will aid in keeping the heat in the pipes and will help save you money. Below are instructions on how to properly install pipe wrap.
Supplies/Tools:
- Pipe Wrap
- Duct Tape
- Knife
- Tape Measure
- Remove any old pipe insulation.
- Measure the circumference of your existing pipe to determine what size pipe insulation you need. The measurement may be listed on the pipe itself (3/4 of an inch in the example).
- Measure the length of pipe insulation that you need and cut to the proper length.
- Open the slit in the insulation and slide over the pipe. Continue steps 3 and 4 until the entire exposed pipe is covered.
- To secure insulation in place, tape the length of the slit.
-
Caulking to Stop Air Leaks
We all want our home to be energy efficient, and according to the U.S. Department of Energy, drafts are responsible for the loss of between 5-30 percent of a home’s energy. Keeping tight seals around your doors and windows is a simple and cost-effective way to help reduce power bills.
Supplies:
Latex Paintable Caulk
Tools:
Standard Caulking Gun
Putty Knife
Scissors or Knife
Towel
Directions:
Caulking compounds vary in strength, properties and prices. For a long-lasting seal, choose permanently waterproof, flexible, shrink-crack-proof 100 percent silicone (specifically for doors and windows), and if you are painting, try paintable silicone. For this project, we will caulk around a door frame.
- Before you apply the caulk, wipe down the surface with a damp cloth to remove any residue or dirt; then strip or scrape old caulk out of the gap or crack.
- Take the tube of caulk and cut the tip at a 45 degree angle.
- Pierce the seal on the cartridge to allow the caulk to flow evenly.
- Insert the tube of caulk into the caulking gun.
- Start applying a bead of caulking to the areas you have prepared, squeezing evenly, and with consistent pressure and speed to control the rate at which the caulk leaves the tube.
- Complete a section at a time and smooth out the caulking with the tip of your finger.
Note: The trick to a good caulking job is to hold it at a consistent angle and draw the bead continuously rather than in a stop-and-start fashion. Then release the trigger before pulling the gun away to avoid excess caulk oozing out.
Caulk forms a flexible seal for cracks, gaps or joints less than one quarter-inch wide. Making smart choices like caulking to stop air seepage throughout your home can help you save energy and money.
-
How to Weather Strip a Door
Does your home have air leaks or “drafts”? Regardless of the term you use, such conditions can significantly raise your energy bill and make your house uncomfortable.
A common area for air leaks is found around doors. To inspect doors for leaks, see if you can rattle them – movement means possible air infiltration. If you can see daylight around a door frame, then the door leaks. You can usually seal these small openings by weather stripping them. In less than 15 minutes and $15 dollars, you can help protect your home from unwanted air. Here are the tools and supplies you’ll need for weather stripping a door:
Supplies: Self Adhesive Foam Weather stripping Door Sweep kit (includes screws)
Tools: Clean Towel Spray Cleaner (like the kind for counters) Scissors Utility Knife Tape Measure Screwdriver Drill
Directions: Doors require two different kinds of weather stripping: sweeps for the bottom and self-adhesive foam for the top and sides.
Installing Self-Adhesive Foam
1. Clean the stop-moulding with a cleaner and dry completely.
2. Cut self-adhesive foam to fit each side and the top of the door. Also, you may need to split the stripping into two portions.
3. Peel the back from the foam and press it into the inside of the stop-moulding.
Installing a Door Sweep
1. Measure the bottom of the door.
2. Cut the sweep to fit the door, using a utility knife and/or scissors.
3. Holding the stop up to the door, mark where the screw holes of the stop are.
4. Drill holes in the door at the designated marks.
5. With the door closed, screw the sweep to the door so the bottom of the fin is in contact with the floor.
When finished, sit back and enjoy the energy savings of stopping cold air from entering your home in the winter, and warm air from infiltrating in the summer—a year full of savings in one simple project!
-
Insulating Foam Sealant
Air leakage through small holes and cracks around the home is a major cause of heating and cooling loss. According to a report by the Oak Ridge National Laboratory and Pacific Northwest National Laboratory, a homeowner can save 10 to 20 percent on their heating and cooling costs just by closing up those air leaks. To reduce energy costs, air-seal and eliminate drafts by applying insulating foam sealant throughout your home. Foam sealants expand to form an outer skin containing closed air cells providing an effective barrier against energy loss and can be used around windows and doors, plumbing fixtures, electrical outlets, baseboards, sill plates, exhaust vents, siding edges, sky lights, attic fans, garage ceilings, etc.
Insulating foam sealants come in different applications (i.e. windows and doors, gaps and cracks, firelock, aquascape, and landscape). Be sure to apply the appropriate foam sealant and read all directions thoroughly before applying.
-
Blower Door Testing: Is My House Leaky or Tight?
When you hear of leaks in your home, you probably think of those involving water and plumbing, but what about air leaks? Homes that experience excessive air leakage are difficult to heat and cool. Too much air flowing in and out of your house can cause several problems such as wasted energy and high cooling and heating costs, moisture condensation, uncomfortable drafts from the outdoors and poor air quality flowing throughout your home. In fact, air leakage can account for up to 30 percent of your cooling and heating costs. The only way to know whether your home is leaky or tight is to measure its air leakage rate with a blower door test conducted by a trained professional. This test provides a highly accurate and cost-effective method for determining your home’s air leakage performance.
A blower door is a powerful fan that mounts into the frame of an exterior door. The “door” comes with a built-in fan and multiple gauges that measure air pressure. The fan removes air from your house, lowering the pressure inside. In turn, higher-pressure outdoor air will work its way through cracks and unsealed openings, making the leaks easier to measure and locate.
Before a blower door test can be performed, the following preparation is required:
- Close all exterior doors and windows
- Open all interior doors
- Remove any ashes from open fireplaces or cover the ashes with damp newspapers
- Walk-through your home with the auditor to point out areas that you know are drafty or difficult to condition comfortably
- Close any fireplace dampers, doors and woodstove air inlets
- Turn off the clothes dryer and all bathroom and kitchen exhaust fans
Once the blower door is set up and operating, many leaks can be found by feeling around with your bare hands or with the use of an infrared camera. The infrared camera finds air leaks through temperature differences. To use the camera alone, the temperature outside and temperature inside have to be very different, but since it’s difficult to plan an audit around the temperature outside, it is best to use the blower door and camera together. By creating a pressure difference that allows the air to move, it is not necessary for there to be a large temperature difference to be able to see the air movement through the cracks and holes allowing for a much better chance to find all the problem areas. View our video about this process.
After the blower door test is completed and the air leakage rate for your home is determined and evaluated, the auditor will assist you in identifying improvements that will potentially save the most on your energy costs and recommendations to improve comfort and indoor air quality can then be made.
When you have a home energy audit conducted by CAEC’s Energy Services Representative, a Certified Residential Energy Auditor, you can choose which level works best for you and your budget. The initial cost of either audit is reimbursed when ESR-recommended improvements are made to the home within a 12-month period of time. The Basic Audit cost is $75 and the Advanced Audit (includes blower door test) cost is $100. For more information, see our energy audit page for more details or call (800) 545-5735 ext. 2178 or (334) 351-2178.
-
Insulating and Sealing Your Attic Access
Even in a well-insulated home, one of the most common and overlooked areas for an inadequately insulated space may be the access to the attic. Your home’s attic access, which could be an attic hatch, pull-down stairs or a knee-wall door, is often uninsulated. A one-quarter inch gap around the perimeter of an entry can potentially leak the same amount of air supplied by a typical bedroom cooling and heating vent.
But before insulating the area, you should first determine the recommended insulation R-value. An R-value indicates insulation’s resistance to heat flow – the higher the R-value, the greater the insulating effectiveness.
The location of your attic entrance will affect how or whether it should be insulated. For example, if the access is in a garage where the attic is uninsulated, you can eliminate the need for insulation, but if the entrance is in your home, such as in a hallway, you may need to invest in insulation.
Attic hatches, or scuttle holes, are the most common forms of access and easily fixed for energy efficiency. The hole is simply a removable portion of the ceiling allowing entry to the attic and is most likely located in a closet or main hallway. Usually, they are constructed from thin wood or drywall, neither of which provides any substantial resistance to heat loss. For sealing, weatherstripping can be installed either on the hatch itself or on the inside of the trim or base where the hatch rests. For insulation, attach a piece of fiberglass batting (the easiest material to use for this type of opening) on top of the hatch. Add a latch bolt to help ensure a tighter seal.
When gaining attic access through pull-down stairs, the frame encasing the stairs fits in an uneven opening and leaves a gap, much like a door or window, which must be sealed. If the gap is small (less than half an inch), caulk can be used as a sealant. If a larger opening exists, then a non-expanding foam or a backing material is suggested in combination with the caulk. Although expanding foam can be applied, be cautious because of its highly expansive nature, it could potentially distort the frame and obstruct the ability of the stairs to open and close correctly.
Furthermore, to insulate attic stairs, a moveable box can be constructed from rigid foam or fibrous duct board to fit over the stairs from the attic side. For added insulation, attach a piece of fiberglass batting on top of the box. Insulating kits are also available through weatherization suppliers or from local hardware stores.
A knee-wall door is typically a partial size door that is usually found in the upstairs level of finished-attic homes. These doors are often poorly insulated and unsealed around the frame. Make sure the knee-wall door is weatherstripped around the frame and insulate the attic side of the door. Add a latch that pulls it tightly against the frame to achieve a solid seal.
A well-insulated and sealed attic access will prevent air leakage in your home, thereby reducing energy costs and preventing discomfort. Most attic insulation and sealing systems require minimal time to install using simple tools and techniques. And as with all home projects, be sure to follow the manufacturer’s instructions for proper installation and safety.