
Energy Saving Tips
-
Light up Your Holidays for Less with LEDs
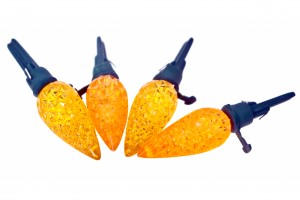 When store aisles are full of holiday décor and you might notice that not only do some of these items make your home look festive, but they do so while saving money on your energy bill. LED (Light-emitting diodes) Christmas lights not only offer a quality alternative to traditional incandescents, but many other advantages as well.
First, using LED Christmas lights on a 6-foot tree, 12 hours a day for over 40 days can save at least 90 percent on holiday light energy costs when compared to using traditional incandescent lights. LED’s also have a much longer operational life span, lasting roughly 20,000 hours and are cooler to the touch than incandescents—helping to reduce the risk of fire and personal injury.
While many LED lights are made in the same shapes and varieties as traditional lights, they are more durable than incandescent lamps and are typically made of solid plastic rather than glass.
When purchasing LED’s, look for manufacturers and brands with the ENERGY STAR logo designating them as having been tested for energy efficiency and quality standards. And as always, make sure you purchase the correct light for the job—outdoor lights should only be used outdoors and indoor lights for indoors.
Show your holiday spirit this season, and save on your energy bills at the same time with LED holiday lights.
-
Beat the Heat with these Energy Efficiency Tips
During the summer, many of us are excited about our family vacations that we’ve been planning all year long. However, some of us will be pondering ideas to create the most amazing staycations we can afford. Whatever the case may be, CAEC is here to help you be more efficient, saving your energy dollars so you can use them for summer activities.
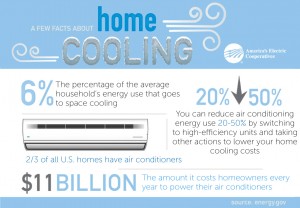
One of the major proponents of high energy consumption can be your heat pump. Statistics show that heat pumps account for a little over half (54 percent) of the average home’s utility costs. With that in mind, it’s a great time to look at some “no and low” cost tips to keep the cool air in and the warm air out.
First, help keep your unit running at peak performance—the better it can do its job, the less energy it will use. Simply changing or cleaning your air filters at least once a month and ensuring the outside unit is clear of debris, such as leaves and lawn clippings, can help. You can go a step further by having your unit serviced by a trained HVAC technician. A pre-summer tune up can not only increase efficiency, but also help identify potential issues before they turn into a major, and costly, problem when the summer heat is on.
Second, check out your unit’s thermostat. Make sure the fan switch is on “auto” to save energy. Leaving it in the “on” position keeps air running constantly and using energy. As temperatures rise, try setting your thermostat at 78 degrees, which will feel great compared to the 90 degree plus outside temperatures as well as help save on cooling costs. You can have even more control by installing a programmable thermostat, which will allow you to adjust the indoor temperature during the day.
Once you have your unit running efficiently, keep that climate controlled air inside your home by checking for household leaks and make sure air isn’t escaping through any openings such as fireplace dampers, doors and windows. If you can see light around your doors and windows, it might be a good time to invest in weather stripping to better insulate your home’s interior climate.
Cooling costs are determined by comfort, and installing ceiling fans, which use no more electricity than a standard light bulb, can help you feel cooler and use less HVAC dollars. Make sure you turn the blades in a counter-clockwise direction in the summer and turn them off when you leave—since fans are meant to cool people and not the actual room temperature.
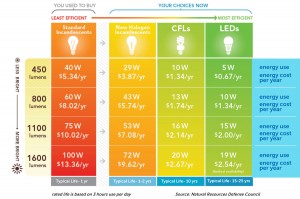
Another way to reduce heat and increase efficiency in your home is to replace burnt out incandescent bulbs with new energy efficient CFL’s or LED light bulbs. Not only do CFL and LED bulbs use 75-80 percent less energy than incandescent and last about 10-25 times longer, they produce less heat than incandescent bulbs, which use 90 percent of their energy producing heat.When the whole family gets involved in the process, this will not only result in savings, it will also produce better energy habits. It is our desire to help you achieve the best value for the energy dollars you spend, allowing you to beat the heat and invest your savings in summertime family memories.
-
A Clear Picture of Television Energy Usage
The days are getting shorter and cooler, which will lead many of us to spend more time in the house watching our favorite shows or sporting events. A 2011 Nielson
 report found the average American household owns 2.5 televisions and 31 percent of us have four or more sets in our homes. According to the National Resources Defense Council (NRDC), U.S. televisions use more than 46 billion kilowatt-hours (kWh) annually, or about 4 percent of total residential power consumption.
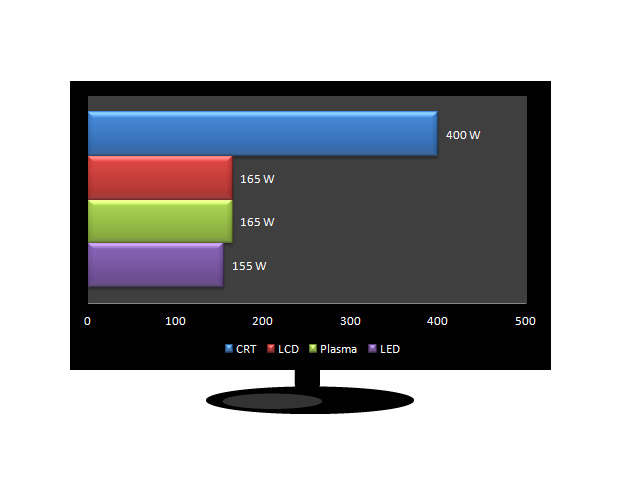
But which type of television is the best when it comes to energy use? The most common found in our living rooms are the traditional cathode-ray tube (CRT) sets, plasma, LED (Light Emitting Diode) and LCD (Liquid-Crystal Display). You might be shocked to find out that of these four, it is the CRT that is the energy hog— drawing more power per unit of screen area than the other three.
Research conducted by E Source, an energy efficiency and technology company, in 2011 compared a 55-inch of each style for five hours in active, or “on,” mode. The CRT set used a staggering 400 watts (W) followed distantly by the plasma and LCD sets at 165 W and finally by the LED at 155 W. The data also revealed that the same televisions in standby mode (when the television is turned off, but still plugged in and drawing some power) for 19 hours a day, the CRT drew 8 W compared to the LCD drawing .4 W. And a 25-inch CRT used more power than a 35-inch LCD at 95 W and 65 W respectively.
Many find this hard to believe, as it was plasma TVs having a reputation for being major energy drains. There was some justification to this in the past, when an average model drew more power than a CRT or LCD, but today’s plasma draws nearly the same power as a comparable LCD in sizes larger than 31 inches.
Why the jump in efficiency? The increased manufacture of larger, flat screen televisions left the CRT to be, in essence, phased out of the commercial market when production ceased in 2007. This left plasma, LCD and LED models to follow many sets of revised energy standards set by Energy Star and state regulations.
Another energy drain connected to our home’s TVs is the increased use of set-top box receivers. More than 80 percent of us subscribe to some form of pay television service with approximately 160 million set-top boxes (including DVRs), nearly all of which are owned and installed by cable, satellite or phone providers. NRDC found that in 2010, these boxes consumed 27 billion kilowatt-hours (kWh) of electricity, or the equivalent of the annual output of nine average (500 MW) coal-fired power plants. They also noted that two-thirds of their annual energy usage occurs when people are not even watching or recording content.
So what can you do to increase your TV’s energy efficiency? It may be a good idea to replace your CRT set for a more efficient model. Be sure to look for Energy Star ratings and read labels to estimate the annual energy consumption. If you already own an LCD TV, turn down the backlight in the television’s settings—you’ll save energy and still retain picture quality. Also, if you have TVs in multiple rooms and use a set-top box, consolidate to a multi-room model. And if your TV or box provides a power saver mode, use it or unplug both devices when you go out of town.
