Do-It-Yourself

  • Spring into Energy Savings with 3 easy tips

    Winter weather can have a big impact on your energy bills, hitting your pockets a little harder than you would have liked. Now that spring is just around the corner, it’s the perfect time to tackle a few DIY efficiency projects for your home. The good news: You don’t have to be an energy expert to do this!

    There are several easy ways to save energy, but if you’re willing to take a hands-on approach, here are three projects you can do now to start saving.

    Make the Most of Your Water Heater.

    Let’s start with one of the easiest projects: insulating your water heater. Insulating a water heater that’s warm to the touch can save 7 to 16 percent annually on your water heating bills. It should also be noted that if your water heater is new, it is likely already insulated. But if your water heater is warm to the touch, it needs additional insulation.

    You can purchase a pre-cut jacket or blanket for about $20. You’ll also need two people for this project. Before you start, turn off the water heater. Wrap the blanket around the water heater and tape it to temporarily keep it in place. If necessary, use a marker to note the areas where the controls are so you can cut them out. Once the blanket is positioned correctly tape it permanently in place, then turn the water heater back on. If you have an electric water heater, do not set the thermostat above 130 degrees, which can cause overheating.

    Seal Air Leaks with Caulk.

    The average American family spends $2,000 annually on energy bills, but unfortunately, much of that money is wasted through air leaks in the home. Applying caulk around windows, doors, electrical wiring and plumbing can save energy and money. There are many different types of caulking compounds available, but the most popular choice is silicone. Silicone caulk is waterproof, flexible and won’t shrink or crack.

    Before applying new caulk, clean and remove any old caulk or paint with a putty knife, screwdriver, brush or solvent. The area should be dry before you apply the new caulk.

    Apply the caulk in one continuous stream, and make sure it sticks to both sides of the crack or seam. Afterwards, use a putty knife to smooth out the caulk, then wipe the surface with a dry cloth.

    Weather Strip Exterior Doors.

    One of the best ways to seal air leaks is to weather strip exterior doors, which can keep out drafts and help you control energy costs. Weather stripping materials vary, but you can ask your local hardware or home store for assistance if you’re unsure about the supplies you need.

    When choosing weather stripping materials, make sure it can withstand temperature changes, friction and the general “wear and tear” for the location of the door. Keep in mind, you will need separate materials for the door sweep (at the bottom of the door) and the top and sides.

    Before applying the new weather stripping, clean the moulding with water and soap, then let the area dry completely. Measure each side of the door, then cut the weather stripping to fit each section. Make sure the weather stripping fits snugly against both surfaces so it compresses when the door is closed.

    By completing these simple efficiency projects, you can save energy (and money!) while increasing the comfort level of your home. And you can impress your family and friends with your savvy energy-saving skills.

  • Tips to help your AC & power bill

    It’s just plain hot and we all know our AC units are working overtime to keep up. Here’s some other things you can do to help take the load off your AC and your power bill.

    1. Use Fans: Utilize ceiling fans or portable fans to circulate air, which can make the room feel cooler without relying solely on the air conditioner. But only use them when you’re in the room


    1. Close Curtains and Blinds: Keep curtains and blinds closed during the hottest parts of the day to block out direct sunlight and prevent the interior from heating up.


    1. Insulate Windows and Doors: Check for air leaks around windows and doors and seal them with weatherstripping or caulk to prevent cool air from escaping and warm air from entering.


    1. Adjust Thermostat Settings: Set your thermostat to a higher temperature when you’re away from home and lower it when you’re back. Consider investing in a programmable thermostat to automate this process.


    1. Use Appliances Wisely: Avoid using heat-producing appliances (ovens, stoves, dryers) during the hottest hours of the day. Opt for outdoor grilling or cook meals that require minimal heat.


    1. Regular Maintenance: Clean or replace air filters regularly to maintain the efficiency of your air conditioner. Consider having an HVAC professional inspect and service your system annually.
    2. Unplug Devices: Unplug electronics and chargers when they are not in use, as they can still consume power even in standby mode.


    By following these tips, you can improve energy efficiency in your home during the summer months, ease the burden on your air conditioner, and potentially lower your energy bills.

  • High temperatures = higher utility bills

    In Alabama the summer gets hot, really hot. We deal with high temperatures, higher humidity and more often than not, higher electric bills due to our cooling systems working harder to maintain a level of comfort inside of our homes. Many members use heat pumps as a cooling system, so it’s best to understand how they work and the most efficient way to use them.

    Most heat pumps are designed to work most efficiently at 95 degrees and below; they also are intended to hold a maximum 20-degree difference from the outside temperature to the thermostat setting in the home. Once the outside weather exceeds that 95-degree threshold, the heat pump must run almost nonstop in an attempt to maintain that 20-degree difference. For example, if you have your thermostat set to 68 degrees and it’s 95 degrees outside (equaling a 27 degree difference), your unit will continue to work with a goal of maintaining the 20-degree difference for which it was designed. The best way to save on your energy bill during these times is to turn your unit up to 78 degrees, which helps reduce the 20-degree window, and use fans to increase your comfort. Although higher temperatures usually mean higher bills, there are some things you can do to help lower your energy use in other ways.

    A programmable thermostat can make it easy to increase your temperature to a higher setting when you’re not home.

    • Do not close off rooms or vents. By doing so, you’re forcing cooled air back into the unit, which may cause damage to it and the duct work over time and in actuality, doesn’t reduce the amount of cooled air your unit produces. It also causes your unit to run inefficiently and increase your energy use.
    • Avoid placing lamps or TV sets near your thermostat. The thermostat senses heat from these appliances, which can cause the air conditioner to run longer than necessary.
    • Using a ceiling fan will allow you to increase your thermostat setting by four degrees and you will not notice any change in temperature. Fans that have the ENERGY STAR label move air 20 percent more efficiently than other models. Since they only increase your comfort and do not impact the actual temperature in the home, make sure you turn them off when you’re not using the room to reduce energy use.
    • Water heating accounts for about 18 percent of the energy consumed in your home. Turn down the temperature of your water heater to the warm setting (120°F). You’ll not only save energy, you’ll avoid scalding.
    • When you shower or take a bath, use the bathroom fan to remove the heat and humidity from your home. Make sure bathroom fans are vented to the outside (not just to the attic).
    • Wash clothes in cold water and only full loads of clothes, clean the lint filter in the dryer after every use. Wash and run full dishwashers at night, and air-dry dishes and clothing to help add to your energy savings.
    • If you have a pool, consider slowly reducing pool filtration time by 30 minute increments daily. Keep on reducing the time as long as the water appears clean. You may find you only need to run your pool filter six hours a day. Install a timer to control the length of time that the pool pump cycles on. Consult your pool manufacturer if you have any questions or concerns about the amount of time needed to properly filter your pool.

    As always, if you’re looking for more ways to save, contact us to schedule a home energy audit or take a look at our Do-It-Yourself Energy Audit tool.

  • Recipe for efficiency: Dryer lint trap cleaning

    Did you know that the laundry room is one area where you can find energy cost savings? To help increase your dryer’s airflow, make sure the lint trap is properly cleaned out, which means more than just removing the lint. Check out the steps you can take to make your drying process much more efficient.

    Tools: Screwdriver, dish soap, brush or sponge and a towel.

    Step 1: Remove the lint from the trap in the dryer.

    Step 1

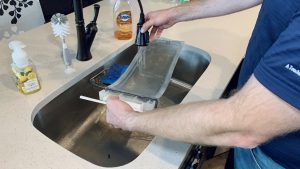
    Step 2: To determine if the trap is clogged, run warm water over the mesh area. If the water puddles up, it needs cleaning. Use warm water and dish soap with a brush or sponge, and clean and dry thoroughly.

    Step 2

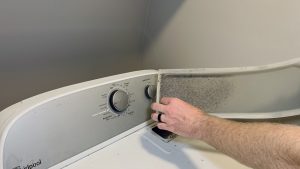
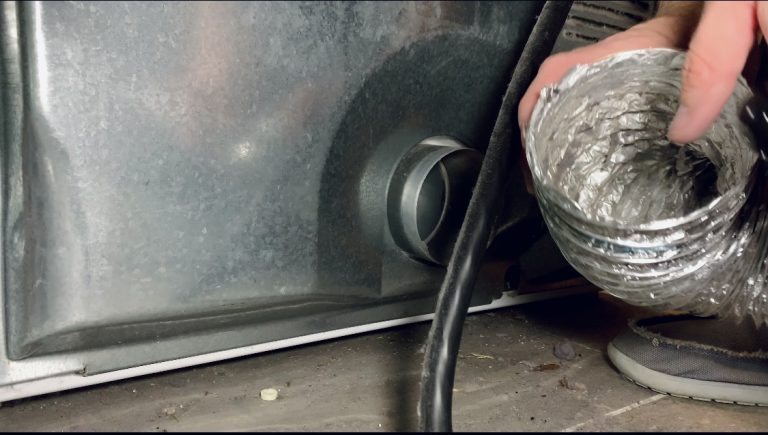
    Step 3: Check the vent hose both from the dryer and the wall. Use a screwdriver to loosen the clamp connecting the hose to the dryer and the wall. Check the openings of both areas and the ends of the hose to verify there is no blockage. Clean out any excess lint and debris. Replace the hose to the wall and dryer and tighten the clamp back down. Verify the hose is still connected when you need to move the dryer.


    Step 3

    Step 4:

    Clean the exhaust outlet, found either outside low on the wall close to your laundry room or in the attic. If in the attic, verify the hose is leaving the attic. Otherwise, the hot air and lint could fall into your insulation or any material beneath it and cause a fire. If this is the case, contact a professional to extend the hose to the outside.

    Step 4

  • Five ways to stay cozy

    When you’re feeling chilly at home, there are several budget-friendly ways you can keep comfortable without turning up the thermostat. Here are five easy ways to stay cozy when you start to feel the chill.

    1. Whether you’re experiencing extremely cold winter temps or are simply too cool for comfort, an electric blanket can deliver quick warmth in ways a regular throw or blanket cannot. Electric blankets can include a variety of features, like timers and dual temperature settings. Consider an electric blanket instead of turning up the heat, and your energy bill will thank you.
    2. One of the easiest ways to stay cozy at home is to keep your feet warm. Our feet play a critical role in regulating body temperature, so when your feet are warm, your body automatically feels warmer. Try a pair of comfortable wool socks or house slippers to stay toasty.
    3. On winter days when the sun is shining, take advantage and harness natural warmth from sunlight. Open all curtains, drapes and blinds in your home to let the sunshine in––you’ll be able to feel the difference.
    4. Another way to make your home cozier is to use a humidifier. Cold air doesn’t hold water vapor like warm air, so by adding humidity inside your home, you can feel a little warmer. A favorable level of humidity inside your home can also help clear sinuses, so en skin and improve sleep.
    5. Beyond adding visual appeal to your home, area rugs can also provide extra insulation and a warm surface for your feet on cold winter days. Use large area rugs in rooms where you spend the most time. You’ll enjoy the new colors and textures of the rug, and the additional warmth will help keep your home comfortable.
  • Efficiently retrofitting your manufactured home

    If you live in a manufactured home, chances are you may have a higher energy bill than a family living in a traditional wood-frame home. The good news is there are many ways you can improve your home’s energy efficiency.

    First, a clarification. Some use the term manufactured home and mobile home interchangeably. A mobile home is a factory built home constructed prior to 1976 when the U.S. Department of Housing and Urban Development (HUD) set national standards that nearly every manufactured home must meet. Thereafter, factory-built homes were called manufactured homes and are engineered and constructed in accordance with the 1976 federal code administered by HUD.

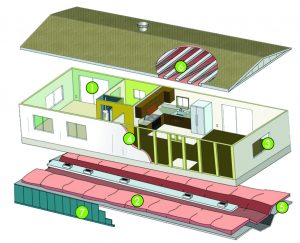
    Manufactured homes come in all shapes and sizes. They may be single- or multi-sectioned and are available in various sizes and floor plan configurations. There are many differences between manufactured homes built before the U.S. HUD Code took effect in 1976 and those built afterward. One of the major differences is energy efficiency. Those built before federal standards were generally not as energy efficient as later models. And while your manufactured home may have been built to the energy standards of the time, significant progress has been made over the past few decades with high-efficiency mechanical equipment, windows, insulation, siding and roofing materials.

    In short, whether your home is less than five years old or more than 50, most homes can benefit from energy efficiency measures simply due to wear and tear. Sunlight, seasonal temperature changes and wind can increase air leakage. Doors and windows may not close tightly and duct work can spring leaks, wasting energy.

    If your home was built before 1976, the Dept. of Energy recommends the following steps to retrofit your manufactured home and improve energy efficiency:

    1. Install energy-efficient windows and doors
    2. Replace insulation in the belly, or floor, of the home
    3. Make general repairs (seal bottom board, caulk windows, doors, ducts, etc.)
    4. Add insulation to your walls
    5. Install or seal belly wrap
    6. Add insulation to your roof or install a roof cap
    7. Install or repair underpinning

    In addition to the measures listed above, consider caulking and weather stripping windows and doors, particularly if you are not able to replace them with more energy-efficient ones. Properly seal any openings around ducts and plumbing fixtures. Replace any incandescent light bulbs with LEDs – both indoors and outside. Reduce “phantom” loads by unplugging electronic devices, such as computers, printers and gaming systems, when not in use. If you are planning to move to a new manufactured home, look for the Energy Star rated model.

    For more information about energy efficiency improvements for manufactured homes, including rebates for installing an energy efficient heat pump, contact our Energy Services Representatives at 1-800-545-5735, ext. 2118.

  • Filling Holes and Cracks with Insulating Foam Sealant

    Air leakage through lots of small holes and cracks around the home is a major cause of heating and cooling loss. In fact, adding up all the holes in the average residence is similar to heating and cooling your house year-round with an open window. To reduce energy costs, air-seal and eliminate drafts, start with an easy fix by applying insulating foam sealant throughout your home. According to the U.S. Environmental Protection Agency, using foam sealant to fill these gaps can typically save up to 20 percent annually on heating and cooling costs.

    Supplies/Tools:

    • Gloves (optional)
    • Eye protection
    • Straight edge or butter knife
    • Insulating foam sealant

    Insulating foam sealants come in different applications (i.e. windows and doors, gaps and cracks, firelock, aquascape and landscape). Be sure to apply the appropriate foam sealant and read all instructions thoroughly before applying. For this application, we will apply a gaps and cracks sealant.

    1. Before you apply the foam, make sure the area is free of dust, dirt and oil.
    2. Apply sealant foam on the outer part of the hole.
    3. Only fill about a quarter of the hole to allow room for the foam to expand.
    4. Use a flat edge tool or butter knife to scrape off excess foam.

    Note: Read instructions to determine drying time of the foam; it may take several hours to dry completely. The cost for a 12-ounce can should be less than $5 at your local hardware or home improvement store.

    Foam sealants expand to form an outer skin containing closed air cells that provide an effective barrier against energy loss. And when dry, most of these sealants can be painted to match trim. Use around windows and doors, plumbing fixtures, electrical outlets, baseboards, sill plates, exhaust vents, siding edges, sky lights, attic fans, garage ceilings, etc. This simple “recipe” can help you conserve energy and reduce heating and cooling bills.

  • How Renters can Fight the Winter Chill

    According to the U.S. Census Bureau, 33 percent of Americans lease their homes. Unfortunately, many lease agreements forbid major alterations to rental properties. But don’t worry, renters! Consider using these low-cost, energy-efficient tips from CAEC to improve the efficiency of your home this winter.

    Hot savings

    Heating the home typically makes up about 48 percent of your utility bill. Set your thermostat as low as is comfortable in the winter – Energy.gov recommends 68 degrees Fahrenheit to boost energy efficiency.

    During the winter months, take advantage of heat from sunlight. Open draperies and shades during the day to allow natural light to heat your home. Remember to close them in the evenings as the temperature drops and windowpanes become chilly.

    Does your home have window air conditioning units? This winter, remember to insulate the units from the outside with a tight-fitting cover, available at your local home improvement center or hardware store. This keeps heated air from escaping outside. If desired, you can remove the window unit during winter months to prevent energy loss.

    Another way to save on heating is to make sure your water heater is set at the lowest comfortable setting. Have you experienced scalding hot water when taking a shower? If so, it’s likely that your water heater is set too high – which is a waste of energy. Older models of water tanks are often not insulated, which can be easily remedied by covering them with an insulating jacket.

    Bright ideas

    Lighting is one of the easiest places to start saving energy, and savings are not strictly limited to winter months. Try replacing a few of your most frequently used light bulbs with ENERGY STAR-qualified lights, and save more than $65 a year in energy costs. ENERGY STAR-qualified LED bulbs use 75 percent less energy and last several times longer than incandescent light bulbs, saving money on energy bills and replacement costs. Practicing energy-efficient habits is another great way to reduce energy use. Always turn off your lights when leaving a room.


  • Insulating Water Lines

    Insulating your home’s water pipes reduces heat loss and can raise water temperature 2-4 degrees Fahrenheit hotter than uninsulated pipes, allowing for a lower water temperature setting. You also won’t have to wait as long for hot water, which helps conserve water.

    For exposed lines, such as in the crawlspace, or under a manufactured home, use pipe insulation foam to insulate the lines. Be sure to use the correct diameter based on the diameter of the pipes (i.e. if the diameter of the pipe is three-quarters inch, use the same size insulation). This will insure a tight seal around the lines. When installing foam insulation, do not leave any gaps where cold air could freeze the pipes.

    For a home built on a slab foundation, you do not have to insulate the lines since they are covered by the concrete slab itself. But you do need to keep outdoor faucets protected for cold weather. An easy way to prevent the exposed faucets from freezing is fitting them with faucet covers, available at your local hardware store.

  • Insulating Your Attic Door

    Ever wonder how much your attic entrance costs you each month in regard to your cooling and heating bills? The attic door can be one of the main areas of air infiltration and heat gain/loss in your home due to a lack of insulation and air sealing, essentially making it similar to having an open door to the outside.

    You can insulate the attic door in multiple ways. The example below will show you how to build an encapsulated box. The materials are inexpensive (under $50), widely available, easy to work with and the project takes about 30 minutes.

    Supplies/Tools:

    • Foam board
    • Caulk/foam
    • Foil tape
    • Utility knife
    • Measuring Tape
    1. Measure the length, width and height of your attic access from inside your attic. You will need to measure high enough that the attic ladder can fit inside the box. Be sure to mark the foam board with your recorded measurements.
    2. Cut foam board at measured lengths. Apply safety precautions when utilizing the utility knife, such as cutting away from your body instead of drawing the knife towards you. Verify the pieces will fit over the attic door when closed before attaching the pieces.
    3. Tape pieces together with foil tape.
    4. Seal any gaps with caulk or foam. (Tip: If the hole is bigger than your thumb, use foam).
    5. Place box over attic door and verify the door will close without moving the box.

    This is a relatively low-cost, simple and quick home efficiency project that can make a big difference in the comfort of your home.


  • Do It Yourself Installing a Programmable Thermostat

    Imagine the air conditioning automatically cooling your home 10 minutes before you walk through the door. And wouldn’t it be nice not having to remember to bump the temperature back up as you leave for work? These small advantages make the programmable thermostat not only a budget-friendly upgrade, but a welcomed convenience.

    Also on the market are smart programmable thermostats which are connected to Wi-Fi, allowing you to program your thermostat from your computer, tablet and smartphone.

    According to the Department of Energy, installing a programmable thermostat can help you save between 5 and 15 percent on your monthly cooling and heating bills. The process to install a traditional programmable thermostat takes less than an hour, and with many models available starting at $25, you can recoup the initial expenditure after only one year of use.

    Supplies/Tools:

    • Programmable Thermostat
    • Batteries (if applicable)
    • Screwdriver
    • Drill/driver
    1. Turn off the power supply to the thermostat at the breaker box and cut power to the indoor HVAC unit. This could be a switch or a breaker; it will be near the indoor air handler.
    2. Remove the old thermostat cover.
    3. Remove wires one at a time from the old thermostat and label each one with labels from the new thermostat. Once all the wires are labelled, remove the old thermostat plate from the wall. If the old thermostat contains mercury tubes, it must be recycled—check with your local hardware store for proper disposal.
    4. Install the new wall plate. Use a level and mark the location for the mounting holes. Drill the holes and, if needed, insert drywall anchors which should be provided with the new thermostat (this step will vary depending on the model). Feed the wires through the wall plate, pulling the wires out about an inch so they don’t fall back into the wall, then fasten the plate to the wall with a screwdriver.
    5. Follow the instructions in your manual to verify all the wires are connected correctly. The instructions should include two sets of wiring guides: one for a heat pump and one for a conventional (electric furnace) system.
    6. Install batteries (if appropriate) in the new thermostat and insert new faceplate.
    7. Restore power at the main breaker and next to the indoor air handler. Program the new thermostat according to the manufacturer’s instructions. Test the new thermostat to make sure it’s operating properly. If you have a heat pump, ensure the heat strips (auxiliary heat) are not coming on too soon or automatically—an indication of improper installation or an incompatible thermostat.

    Installing a programmable thermostat is a small job that can have a big impact on your monthly cooling and heating bills. For proper installation and safety, be sure to follow the instructions precisely.

  • Do It Yourself Pipe Wrap

    According to the Energy Information Administration, water heating accounts for approximately 18 percent of your home’s energy usage. To help save energy dollars, having an efficient water heater is only one part of the equation. You may be losing heat in the distribution piping from your water heater (even an energy efficient one) to your home’s faucets. Wrapping the exposed pipes from your water heater will aid in keeping the heat in the pipes and will help save you money. Below are instructions on how to properly install pipe wrap.

    Supplies/Tools:

    • Pipe Wrap
    • Duct Tape
    • Knife
    • Tape Measure
    1. Remove any old pipe insulation.
    2. Measure the circumference of your existing pipe to determine what size pipe insulation you need. The measurement may be listed on the pipe itself (3/4 of an inch in the example).
    3. Measure the length of pipe insulation that you need and cut to the proper length.
    4. Open the slit in the insulation and slide over the pipe. Continue steps 3 and 4 until the entire exposed pipe is covered.
    5. To secure insulation in place, tape the length of the slit.